


This is an article to work you down on how I made a powerful web application that has the following features.
My GitHub Portfolio Page
My GitHub Repositories Page
Nested Pages showcasing the data of a designated Repository page
Error Boundary
404 page
Proper SEO
Eye catchy Animations
Media Responsiveness
Deployment/Hosting(Firebase)
Prerequisites:
A good understanding of JavaScript.
Basic Understanding of ReactJS(Hooks,Components,Props,JSX,Routes)
Cascading Style Sheet.
Tools:
React JS
Bootstrap
React Helmet(For SEO)
React Framer Motion(For Animations)
Axios(For API calls)
Hamburger React(For Phone Menu)
React Icons(For Icons)
React Paginate(For Paginations)
React Router(For Routing and accessibility around the App)
Firebase(Hosting)
DEEP DIVE
This web app holds all the major data of my GitHub profile, I started by creating the app locally with the NodeJS command prompt as shown below.
npx create-react-app github-profile-app
After my app was created, I used the NodeJS command prompt as well to move into the folder directory of my app with this command below.
cd github-profile-app
Afterward, I launched my app by making it go live locally with the NodeJS command prompt using the command below.
npm start
This made my app go live on localhost:3000.
I now went to my VScode, opened the GitHub-profile-app folder and added new folders and files to the "src" folder of the app. In the end, I had a folder structure that looked like the image below
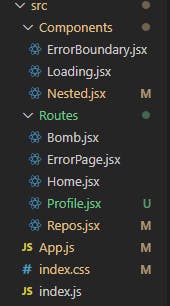
The image above showed that I added two new folders to the "src" folder and these folders were "Components" and "Routes".
The Components folder harbored three files namely: ErrorBoundary.jsx - (Wrote codes to handle Errors from the code base), Loading. jsx - (Wrote codes to handle a loading spinner) and Nested. jsx - (This component made each repository a nested route with code showing details of an individual repository when clicked).
The Routes Folder harbored five files namely: Bomb.jsx - (Handling Error Boundary Test), ErrorPage.jsx - (Handling 404 Pages), Home.jsx - (Handling The Visitor's Welcome Interface), Profile.jsx - (Handling the page having details of my Github Profile), Repos. jsx - (Handling the list of all my GitHub repositories).
Creating a jsx file(React Component)
import React from "react"

function Home(){
    return(
               <>
                   <h1>THIS IS THE HOME PAGE</h1>
               </>
    )
}
export default Home
Installing & Implementing React Router
This was the next approach to getting started with my wonderful GitHub Profile Application.
React Router is a react feature that can handle all the routing and navigation within your application. Remember we will be having a multiple-page app so it is obvious we will be needing React Router.
I went back to my command prompt, cd into my project folder and rightfully installed react-router-dom as shown below
npm install react-router-dom
After my react-router was successfully installed, now is the time to tell you how it was implemented so it can work on our dear application.
- On App.jsx file, Import BrowserRouter as Router, Routes, Route, Link from "react-router-dom(Shown in the code below)
import { BrowserRouter as Router, Routes, Route, Link } from "react-router-dom";
- Go further to declare the routes of all the pages you want to have on your App. Do this by implementing the sample codes shown below.
<Router>
              <Routes>
                <Route path="/" element={<Home />} />
                <Route path="repos" element={<Repos />} />
                <Route path="repos/:reponame" element={<Nested />} />
                <Route path="/bomb" element={<Bomb />} />
                <Route path="*" element={<ErrorPage />} />
              </Routes>
</Router>
The path in the Route handles the navigating path which will lead to the component page in its respective element attribute.
Next is to import all the needed Components into the App.js file so the routes can have access to all of them. This is done as shown in the code below(NOTE: This is only responsive to my folder structure)
import Home from "./Routes/Home";
import Repos from "./Routes/Repos";
import Nested from "./Components/Nested";
import Bomb from "./Routes/Bomb";
import ErrorPage from "./Routes/ErrorPage";
- Finally is using React Links to move from one Route to another in the DOM. This serves as the anchor tag you can have with your pure HTML. The difference is that the React Router's Link element does not re-render the whole page when it is moving within routes. It can be implemented as shown in the code below. The path attribute has the same path record as that of the earlier declared route.
                 <Link to="/" className="Link">
                       <h2>Home</h2>
                  </Link>

                  <Link to="/profile" className="Link">
                       <h2>Profile</h2>
                  </Link>

                  <Link to="/repos" className="Link">
                      <h2>Repos</h2>
                  </Link>
                  <Link to="/bomb" className="Link">
                     <h2>Error</h2>
                  </Link>
                  <Link to="/undefined" className="Link">
                     <h2>404</h2>
                  </Link>
Adding Features To The Home.jsx Page
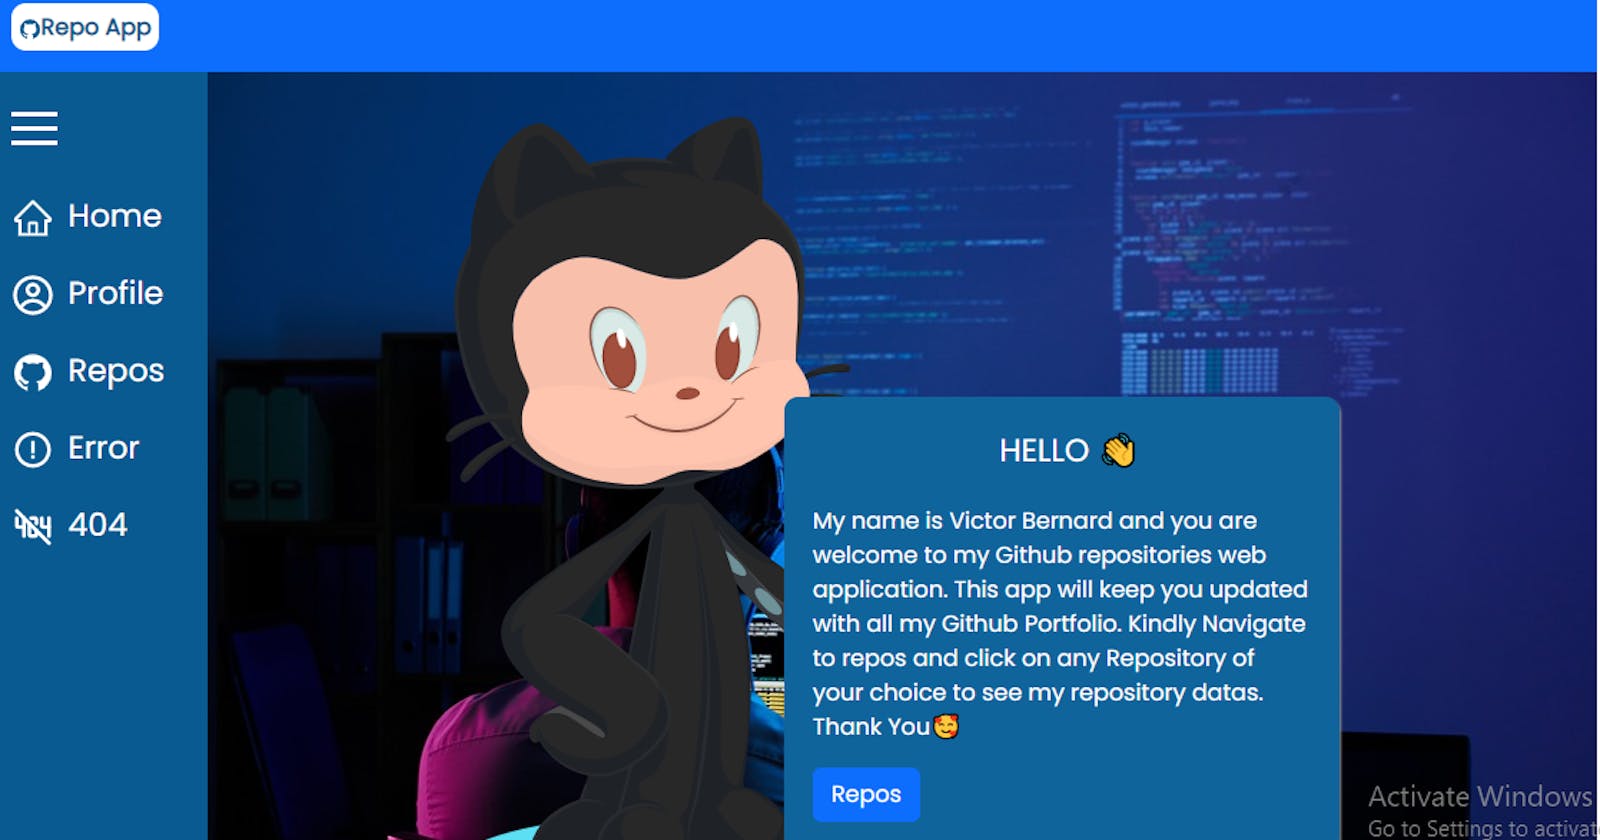
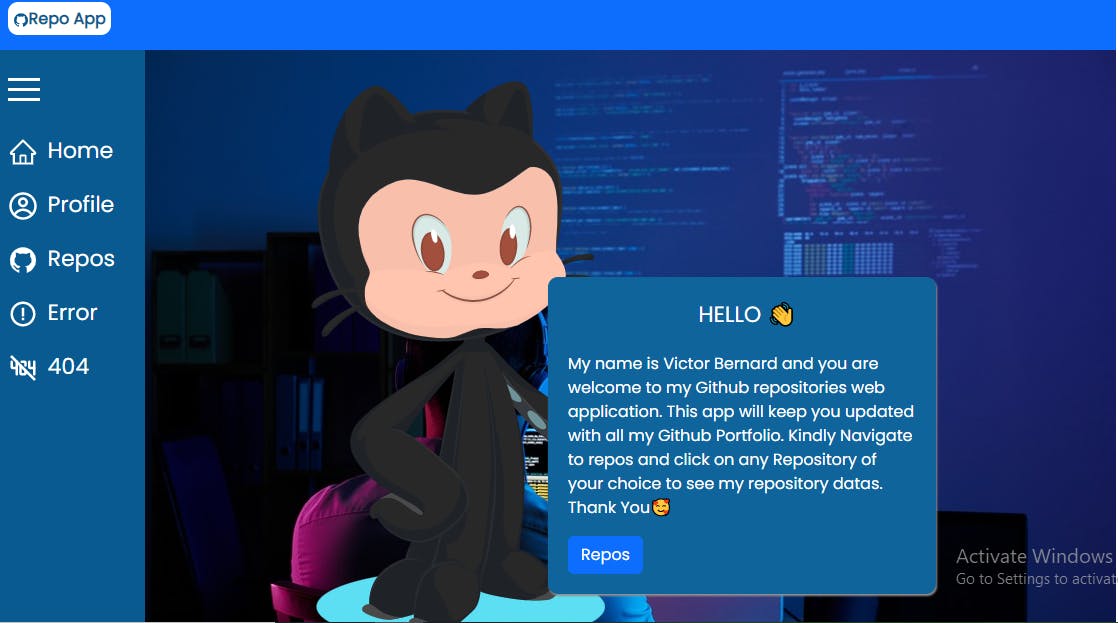
The Home page served as the visitor's welcome page. It only had a welcome text describing the app and a Link that will directly navigate visitors to the repositories page when it is clicked.
import React from "react";

function Home() {
  return (
    <>
      <div className="home"
      >
        <img
          src="https://myoctocat.com/assets/images/base-octocat.svg"
          alt="github cartoon"
        />
        <div className="home-message">
          <h2>HELLO 👋</h2>
          <br></br>
          <p>
            My name is Victor Bernard and you are welcome to my Github
            repositories web application. This app will keep you updated with
            all my Github Portfolio. Kindly Navigate to repos and click on           any
           Repository of your choice to see my repository datas. Thank You🥰
          </p>
          <Link to="/repos" className="btn btn-primary">
            Repos
          </Link>
        </div>
      </div>
    </>
  );
}

export default Home;
Adding Features To The Profile.jsx Page
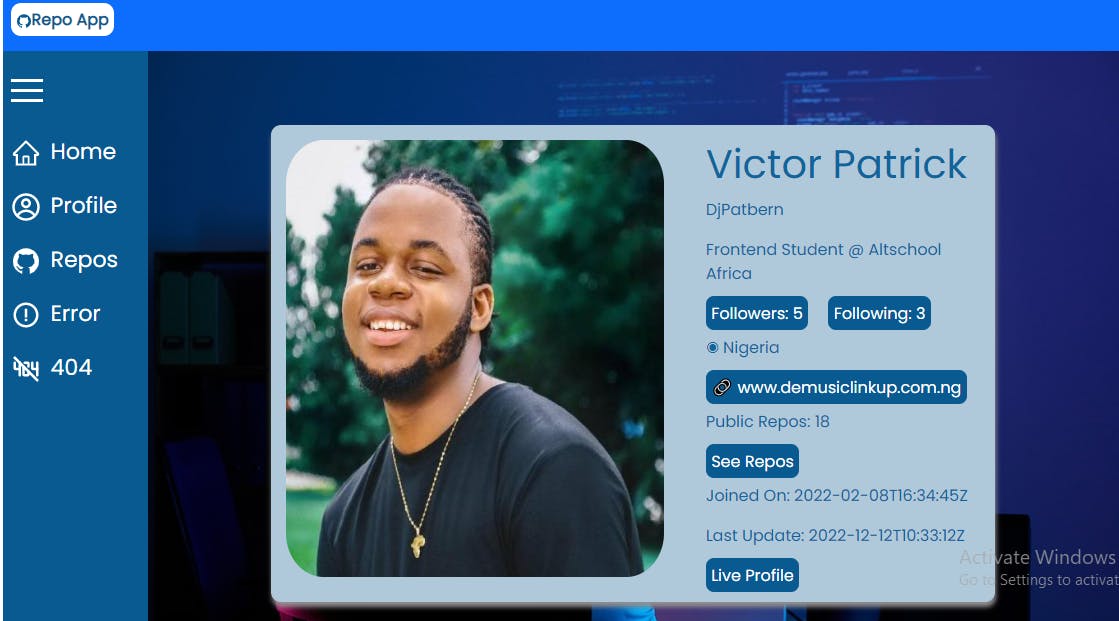
This page holds information on my GitHub Portfolio. This is where you'll have vital information like my GitHub username, Profile Picture, Bio, Number of followers and followings, Date I joined GitHub, date I last updated my GitHub Profile, Number of my Repositories and lots more. I achieved this by fetching data of my GitHub profile from its provided GitHub API using Axios and React useEffect hook, I used useEffect because I want the API to be fetched once the page renders, with this, I am passing an empty array dependency to the useEffect Hook, then created a state using the React useState hook to hold the data I'll be getting from the fetched API and finally displaying the data to the DOM with the state name as shown in the code block below.
NOTE: It has a Loading state which is set to false at the first instance and later set to true after the API data is fetched successfully. The JSX part only displays when the loading state is true(Only when the data is successfully fetched), else a spinner from our <Loading /> Component will spin while awaiting the success of the API call. I achieved this using the JavaScript Ternary Operator.
import React, { useState, useEffect } from "react";
import axios from "axios";
import { Link } from "react-router-dom";
import Loading from "../Components/Loading";

function Profile() {
  const [loading, setLoading] = useState(false); //for Loading state while awaiting api call
  const [profileDatas, setProfileDatas] = useState([]); // State to hold Profile Datas

  useEffect(() => {
    axios.get(`https://api.github.com/users/DjPatbern`).then((response) => {
      setProfileDatas(response.data);
      setLoading(true);
    });
  }, []);

  return (
    <>

      <div className="profile-page"
      >
        {loading ?
<div style={{ color: "white" }}>
          <div className="profile-flex">
                <div>
                <img src={profileDatas.avatar_url} style={{ borderRadius: "10%" }} className="pro-img" />

            </div>
            <div>
            <h1>{profileDatas.name}</h1>
          <p>{profileDatas.login}</p>
          <p>{profileDatas.bio}</p>
          <a href={profileDatas.followers_url} target="_blank" style={{marginRight: "20px"}}>
            Followers: {profileDatas.followers}
          </a>
          <a href={profileDatas.following_url} target="_blank">
            Following: {profileDatas.following}
          </a>
          <p>◉ {profileDatas.location}</p>
          <a href={`https://${profileDatas.blog}`} target="_blank">🔗 {profileDatas.blog}</a>
          <p>Public Repos: {profileDatas.public_repos}</p>
          <a href={profileDatas.repos_url} target="_blank">See Repos</a>
          <p>Joined On: {profileDatas.created_at}</p>
          <p>Last Update: {profileDatas.updated_at}</p>
          <a href={profileDatas.html_url} target="_blank">Live Profile</a>
            </div>
          </div>
        </div> : <Loading />}

      </div>
    </>
  );
}

export default Profile;
Axios in the code is a library used in fetching data from an API, It can be used as shown in the code above after being installed as shown below
npm install axios
Adding Features To The Repos.jsx Page
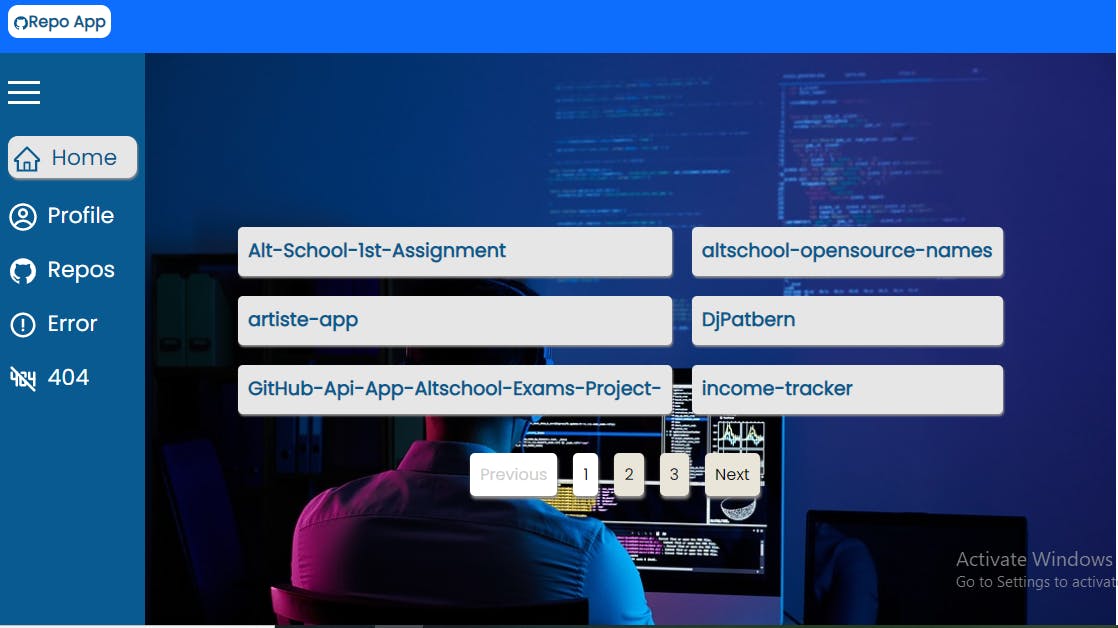
This page holds two important features, A list of all my GitHub repositories and a Number pagination technology that programmatically navigates the visitor to interfaces holding those repositories. Each Paginated nub holds a maximum of 6 repositories, It also has a Next & Previous nub and a state to disable Next & Previous when the visitor is on a pagination nub that holds the first set of the repository list and vice versa.
Repositories displayed here are all made to be React Link Elements because each will link to another Route that will display unique information about the clicked Repository.
DEEP DIVE:
Fetching And Displaying My Repositories
I achieved this by first fetching the data from the GitHub API using React useEffect and Axios. Then I declared a state using React useState to hold the fetched Repositories from the API.
const [repos, setRepos] = useState([])
useEffect(() => {
    axios
      .get(`https://api.github.com/users/DjPatbern/repos`)
      .then((response) => {
        setRepos(response.data);
      })
  }, []);
Finally rendered the declared state to the DOM by mapping out each Repository with the JavaScript Map method.
<div className="reposlist">
          { repos.map((repo) => {
                  return (
                    <Link to={`/repos/${repo.name}`} key={repo.id} className="repo-links">
                    <div  className="each-repo">
                        {repo.name}
                    </div>
                    </Link>
                  );
                })
            }
        </div>
Making Each Repository A Nested Route Link
Recall the Nested Route Component we created at the beginning of our project. That's the component that will handle the data and all the technologies needed to display data of a certain clicked repository from our Repos Page here. The only thing we need to do here is to pass in the name of the Repository to the React Link Path as shown in the code above. The rest will be handled on our Nested Route Page using React useParams.
Handling Pagination To Display Only 6 Repositories On Each Page
I perfectly handled this using a React Library called React Paginate. It is installed as shown below
npm install react-paginate
This library handles a part of the pagination program, disabling states of the Previous & Next Button under the hood for us.
- First, we have to declare a state using React useState to handle the Number of Pagination pages we will be having. It has to be initialized to '0' on the first instance.
const [pageNumber, setPageNumber] = useState(0); // Pagination state
- Declare a variable that will hold the integer denoting the number of Repositories we want to show on each paginate page.
const reposPerPage = 6; // Repositories to be displayed per page
- Declare a variable that will multiply the PageNumber by reposPerpage
const pagesVisited = pageNumber * reposPerPage;
- Declare a variable that will handle the number of paginated pages that will show on the DOM. This is equal to the total number of Repositories divided by the number of repositories we need on each page, rounded to the nearest whole number.
const pageCount = Math.ceil(repos.length / reposPerPage);
- Declare a Function to handle the change of page, This function will be called when the user clicks on any page number and it will change the current page to the page number that was clicked by the user.
  function changePage({ selected }) {
    setPageNumber(selected);
  }
NOTE: The parameter{selected} on the code is React Paginate Library inbuilt Parameter.
- Add a slice method to the mapped-out state holding the fetched repositories. This will handle the math of slicing all the repositories to show a unique 6 on each selected paginate page.
.slice(pagesVisited, pagesVisited + reposPerPage)
- The last is in the ReactPaginate component of the jsx part of our code. This is done by writing down the default React Paginate library code as shown below.
<ReactPaginate
          previousLabel={"Previous"}
          nextLabel={"Next"}
          pageCount={pageCount}
          onPageChange={changePage}
          containerClassName={"paginationBttns"}
          previousLinkClassName={"previousBttn"}
          nextLinkClassName={"nextBttn"}
          disabledClassName={"paginationDisabled"}
          activeClassName={"paginationActive"}
        />
From the code above we can style our pagination with the classNames provided above.
Adding Features To The Nested.jsx Component
This is the component that holds the data of an individual repository, it is made possible through the technology of the React Router Dom's "useParams". The useParams gets the clicked repository's name as a parameter and pass it to the GitHub API link, Making each clicked repository name fetch unique data of itself.
- The first step to achieve this is to declare a route for the Nested.jsx component by passing in a unique id parameter to the path. In our case, we will be using the Repo name as the unique id, so we can call it reponame and it will equal to repo.name on the Repo.jsx component.
<Route path="repos/:reponame" element={<Nested />} />
- The second step is to pass in the repo.name to our clickable repository name's list on Repo.jsx component.
<Link to={`/repos/${repo.name}`} key={repo.id} className="repo-links">
- Then head to the Nested.jsx component, import useParams from react-router-dom, and declare a variable to equal useParams().
import {useParams} from 'react-router-dom'

const params = useParams() //Params for nested repositories
Fetching Data of a clicked Repository
As usual, we declare a state to hold the fetched data we will be getting, we use React useEffect hook and Axios to fetch the GitHub API but this time, the GitHub API will have to act uniquely on the part of the link that is supposed to have the repository's name. This will be done using the params variable we created earlier. The useEffect will depend on the params variable as shown in the useEffect block of the code below.
const [repo, setRepo] = useState({}) // state to hold the datas of each repository

useEffect(() => {
const repoLinkUrl=`https://api.github.com/repos/DjPatbern/${params.reponame}`
      axios.get(repoLinkUrl).then((response) =>  {
        setRepo(response.data)
      })
      });
},[params])
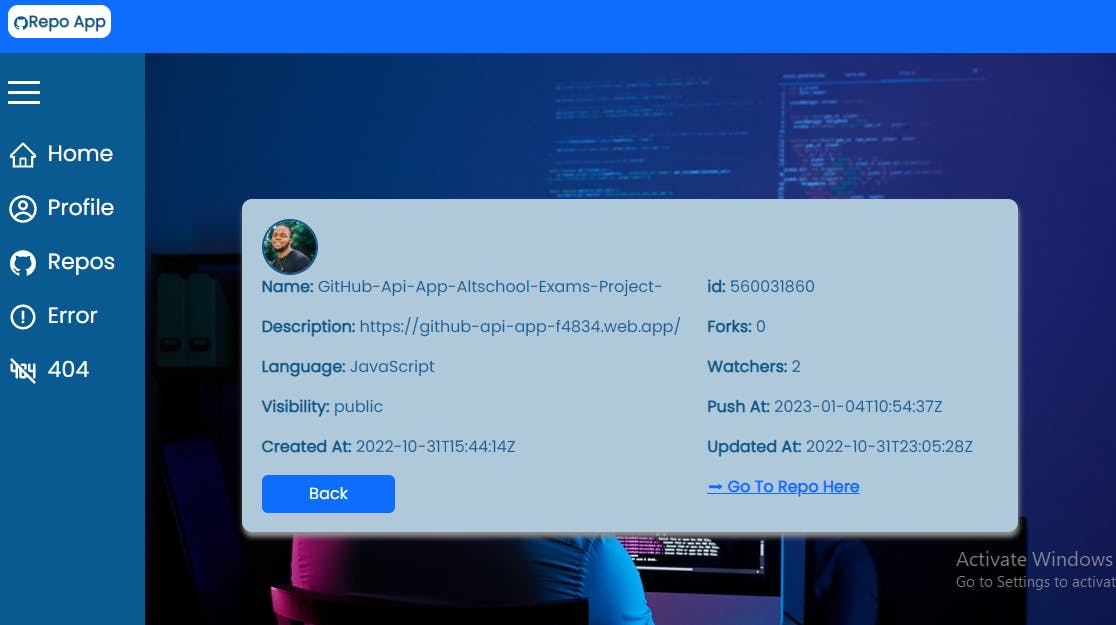
Lastly, we display our fetched data to the DOM through the JSX part of our React Nested.jsx component as shown below.
<div key={repo.id} className='repo-datas'>
 <img src='https://avatars.githubusercontent.com/u/99277508?v=4' alt='Owners Profile Picture' className='repo-avatar' />
    <div className='details-grid'>
    <p><b>Name:</b> {repo.name}</p>
            <p><b>id:</b> {repo.id}</p>
            <p><b>Description:</b> {repo.description}</p>
            <p><b>Forks:</b> {repo.forks}</p>
            <p><b>Language:</b> {repo.language}</p>
            <p><b>Watchers:</b> {repo.watchers}</p>
            <p><b>Visibility:</b> {repo.visibility}</p>
            <p><b>Push At:</b> {repo.pushed_at}</p>
            <p><b>Created At:</b> {repo.created_at}</p>
            <p><b>Updated At:</b> {repo.updated_at}</p>
            <Link className='btn btn-primary back-link' to='/repos'>Back</Link>
            <b><a href={repo.svn_url} target='_blank'>➡ Go To Repo Here</a></b>
    </div>
    </div>
Adding Features To The ErrorPage.jsx Page
This page handles what the DOM will display when a visitor goes to a non-existing route. It is technically known as 404. This technology is achieved by adding the Asterisk symbol(*) to its route's path on App.js as shown below.
<Route path="*" element={<ErrorPage />} />
Heading back to our ErrorPage.jsx file, we can simply render a message to the visitor telling them they navigated into a non-existing route. In my case, I rendered an image carrying a 404 NOT FOUND message as shown in the code below.
<div>
    <img src="https://www.pngitem.com/pimgs/m/162-1622413_4chan-404-pages-hd-png-download.png" alt="404 page display image" />
</div>
Adding Code To The ErrorBoundary.jsx page
This file is used to render a customized error message to visitors. Errors can come from the code base and when it occurs the page can go blank leaving the visitor with no clue of what to do next. With the Error Boundary, A message will be delivered to the user and maybe a link to navigate the visitor back to the home page as implemented in our case code below.
import { Component } from "react";
export class ErrorBoundary extends Component {
    constructor(props){
        super(props)
        this.state = {
            hasError: false
        }
    }
    static getDerivedStateFromError(error){
        return {
            hasError: true
        }
    }
    componentDidCatch(error, errorInfo){
        console.log("Logging", error, errorInfo)
    }

    render(){
        if(this.state.hasError) {
            return(<>
            <h1>Something Went Wrong!!! Contact Our Team For Help</h1>
            <a href='/' className="btn btn-primary">⬅Back To Home</a>
            </>)
        }
        return this.props.children
    }
}
The next thing to be done is to import and wrap our ErrorBoundary component on our entire fallback UI being the jsx part of our App.js as shown in the code below.
import { ErrorBoundary } from "./Components/ErrorBoundary";

function App() {

  return (
      <main>
        <ErrorBoundary>
          <Router>
              <Routes>
                <Route path="/" element={<Home />} />
                <Route path="repos" element={<Repos />} />
                <Route path="repos/:reponame" element={<Nested />} />
                <Route path="/bomb" element={<Bomb />} />
                <Route path="/profile" element={<Profile />} />
                <Route path="*" element={<ErrorPage />} />
              </Routes>
          </Router>
        </ErrorBoundary>
      </main>
  );
}

export default App;
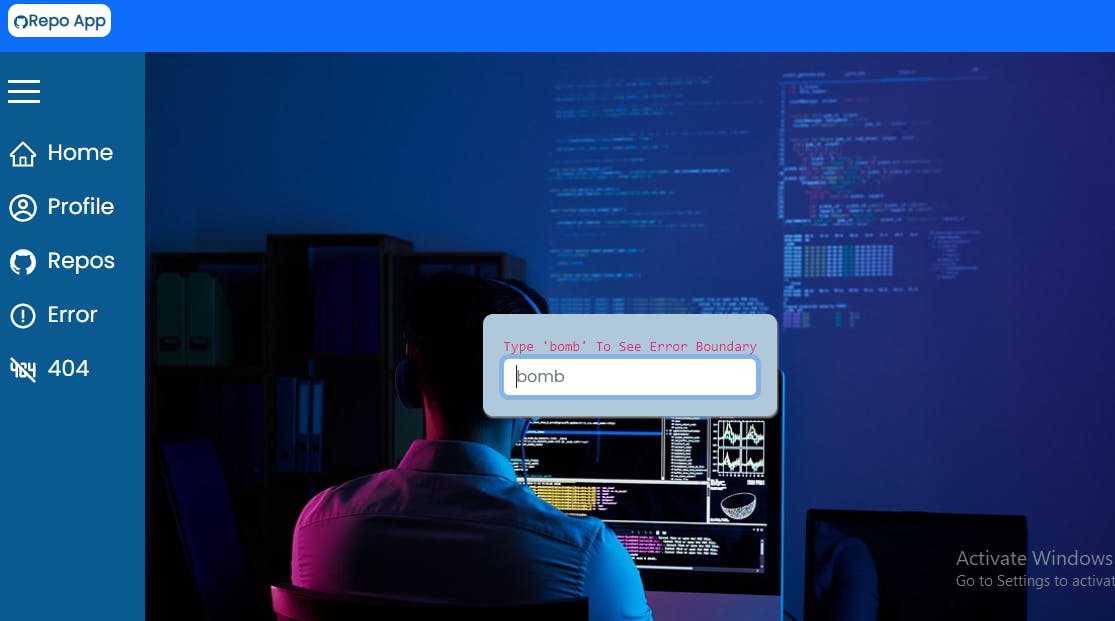
Adding Features To The Bomb.jsx Page
This page is created just to test our Error Boundary Technology. It carries an input field on the jsx part of the code which will throw an error if the user types in 'bomb' on the field. This is possible because it is conditionally programmed on the code block to throw an error once 'bomb' is typed into the input field as shown in the code below.
import React, { useState } from "react";


function Bomb() {
  const [bombMessage, setBombMessage] = useState(""); //State to hold the bomb message

  function ErrorBoundaryTest(event) {
    event.preventDefault();
    setBombMessage(event.target.value);
  }

  function BombError() {
    throw new Error("Something Went Wrong!!! Contact Our Team For Help");
  }

  return (
    <>

      <div className="bomb">
        <div className="bomb-div">
          <code>Type 'bomb' To See Error Boundary</code>
          <input
            className="form-control"
            type="text"
            placeholder="bomb"
            onChange={ErrorBoundaryTest}
            value={bombMessage}
            autoFocus
          />
          {bombMessage === "bomb" ? <BombError /> : ""}
        </div>
      </div>
    </>
  );
}
export default Bomb;
Search Engine Optimization(S.E.O)
This is a technology needed so our web app can be crawled and recognized by Search Engines. Making our app to rank on search engine pages like Google will take a little work from us, we need to configure the pages of our app with an appropriate title, description and other S.E.O relevant properties. In react, a react library called react-helmet can help us achieve this. It gives us the ability to add the above-mentioned properties to our react app pages.
- Install react-helmet
npm i react-helmet-async
- Import the react-helmet Provider on index.js and as well wrap our App Component with it as shown below
import { HelmetProvider } from 'react-helmet-async';

    <HelmetProvider>
    <App />
    </HelmetProvider>
- import it to any component that it will be used on, place the Helmet tag at the top part of the page's jsx and add the desired S.E.O tags to the page as shown in an example of our Home Page below
import React from "react";
import { Helmet } from "react-helmet-async";
import { Link } from "react-router-dom";

function Home() {
  return (
    <>
      <Helmet>
        <title>Home - GitHub API App</title>
        <meta
          name="description"
          content="This is the home page of the GitHub API Fetch Web Application"
        />
        <link rel="canonical" href="/" />
      </Helmet>
      <div className="home">
        <img
          src="https://myoctocat.com/assets/images/base-octocat.svg"                   alt="github cartoon"
        />
        <div className="home-message">
          <h2>HELLO 👋</h2>
          <br></br>
          <p>
            My name is Victor Bernard and you are welcome to my Github
            repositories web application. This app will keep you updated with
            all my Github Portfolio. Kindly Navigate to repos and click on any
            Repository of your choice to see my repository datas. Thank You🥰
          </p>
          <Link to="/repos" className="btn btn-primary">
            Repos
          </Link>
        </div>
      </div>
    </>
  );
}

export default Home;
Hosting/Deploying With Firebase
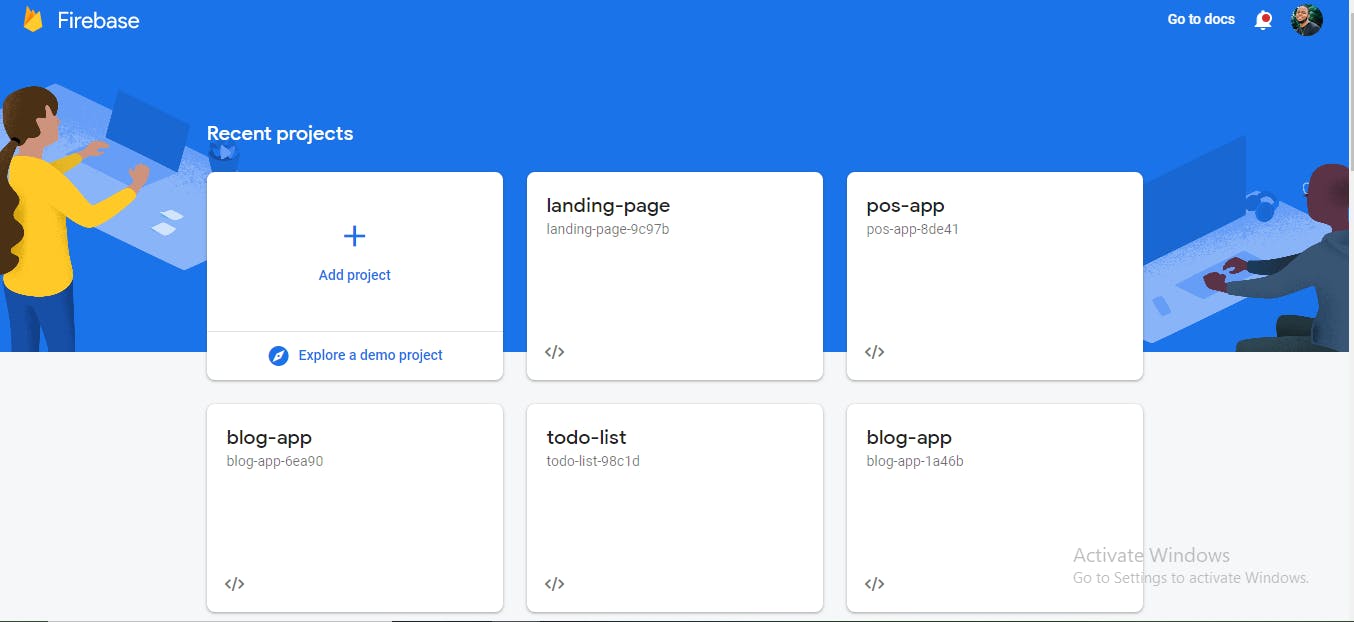
Firebase is a multi-purpose platform that aids a lot in web & app development. Today we will be using it to host and deploy our GitHub API app. First head over to the website www.firebase.google.com, take the necessary signing-up steps, head to the console and click on add project.
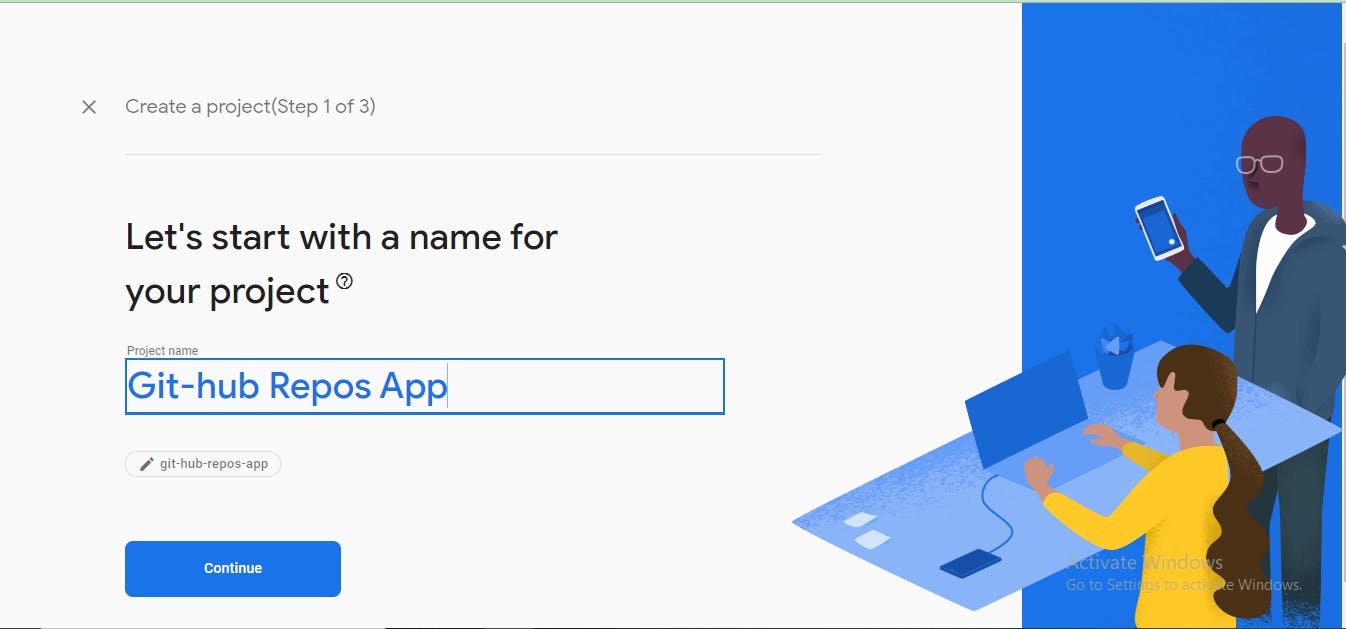
We will add the project by inputting the name of our web app.
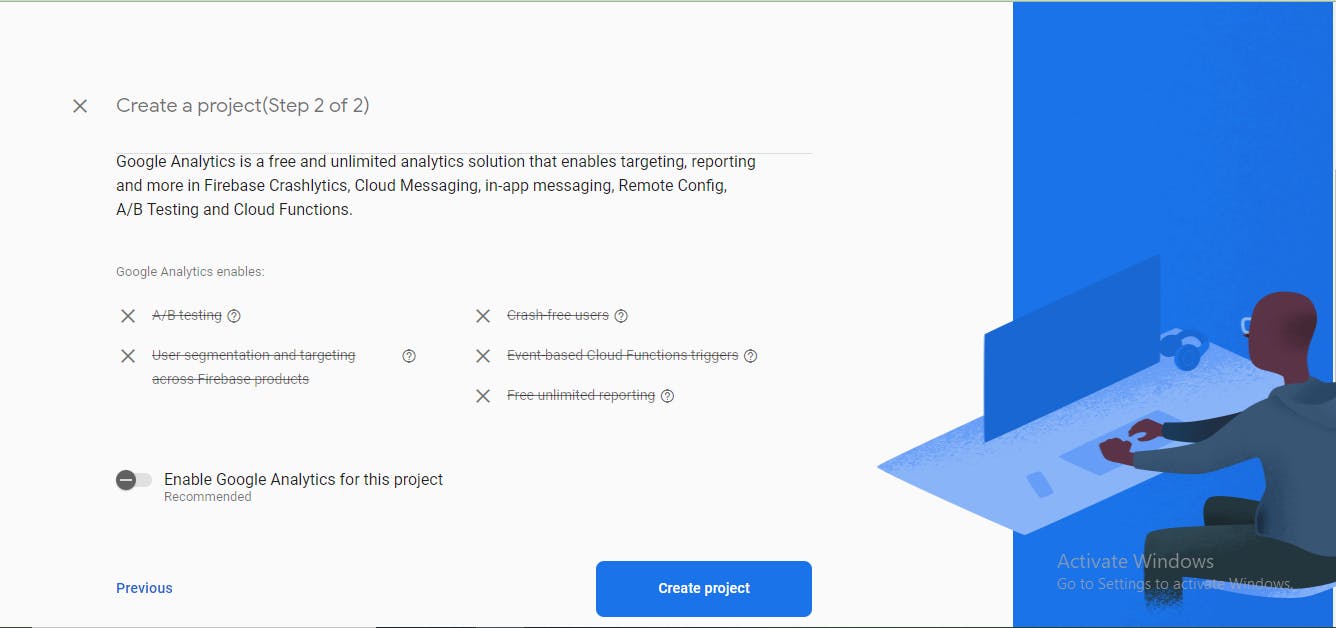
Click continue, in our case, we will be needing only the Firebase hosting service so we can go ahead and disable the Google Analytics services, click on "create project" as shown in the image below to get our web app created on the Firebase Console.
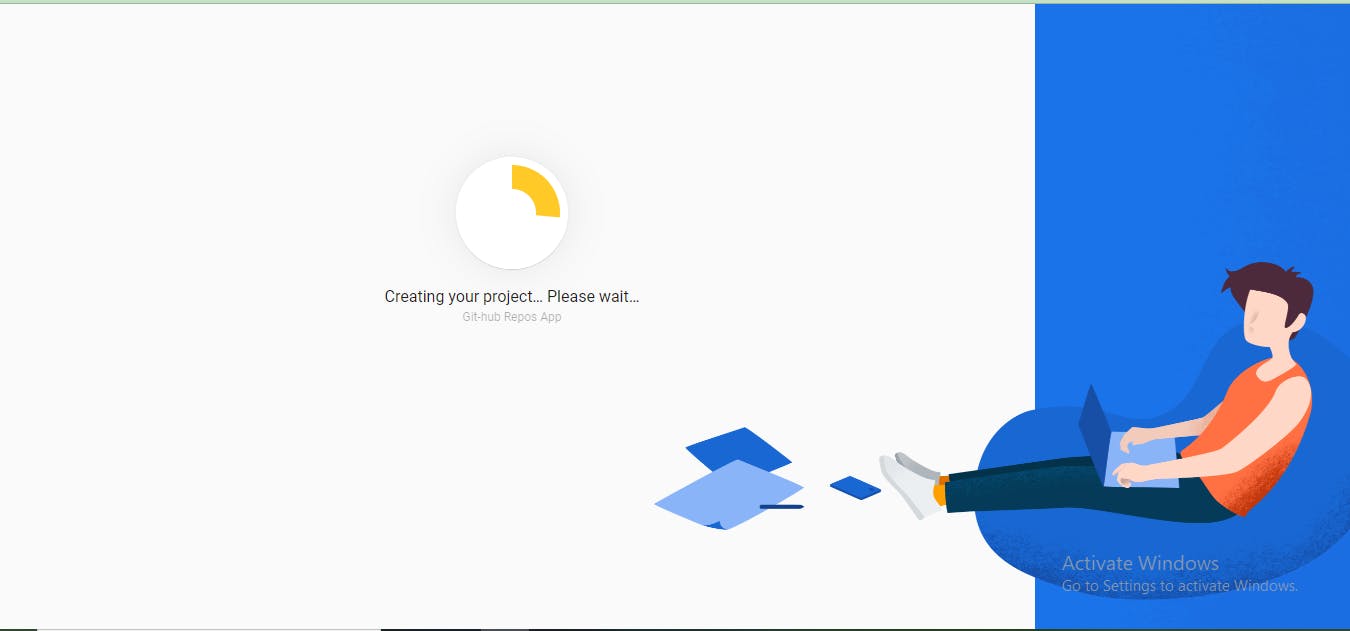
Our project will start creating as seen in the images below.

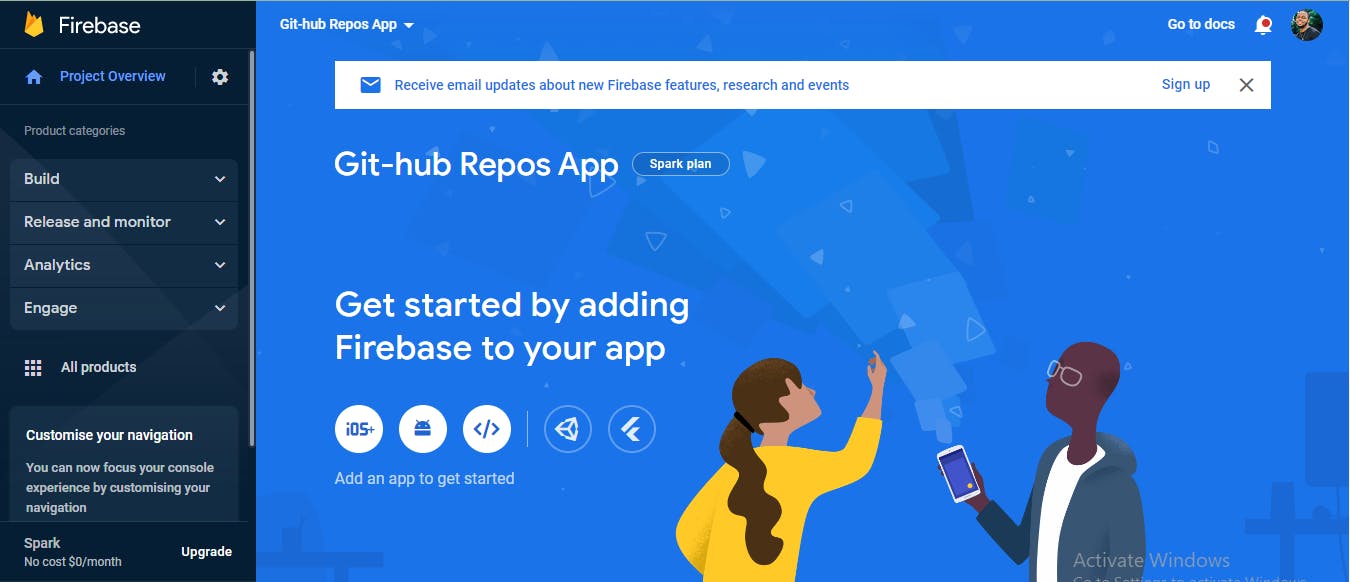
At this point, our project is completely created and added to the firebase console, next thing to do is click "continue" and head over to the next page/step.
This is where you will have to choose the type of Application you want firebase to host for you. In our case, we are hosting a web application so we will simply click on the web app option which is the option here with the denotation </>.
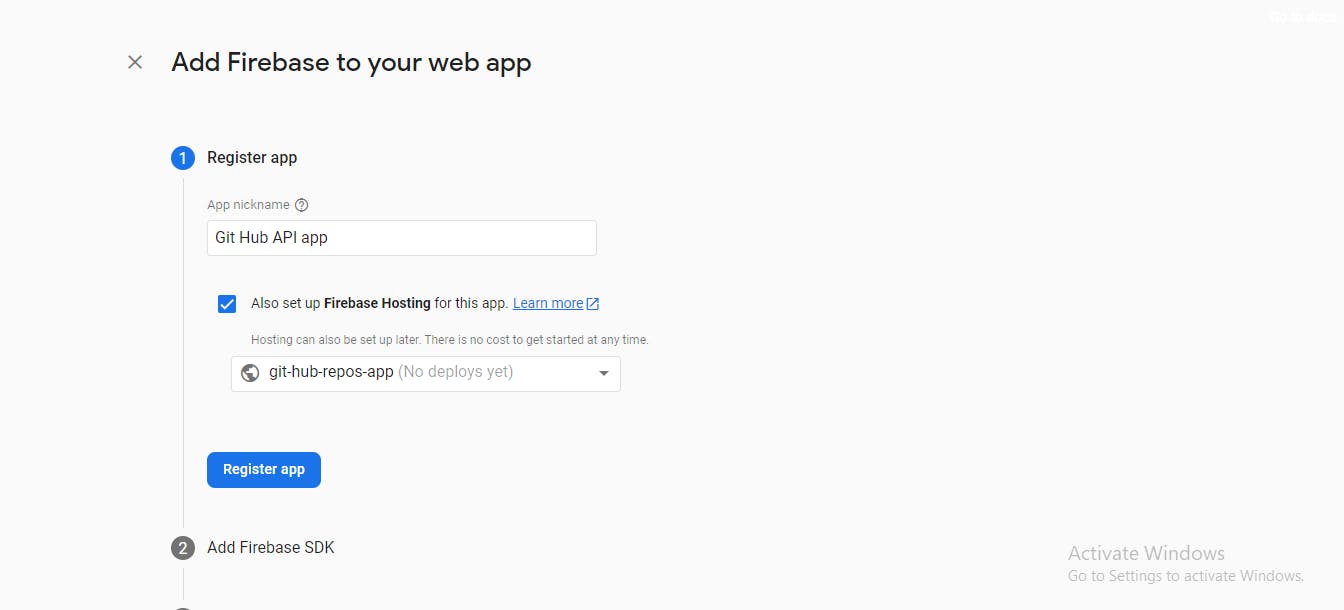
This will head us to a page that will get our app registered, we do this by providing a nickname for our app, thick Set up firebase hosting and click on Register App as shown in the image below.
The end of this process will head us to a page where Firebase provides us with all the command lines/Scripts needed to connect our created project in the firebase console to our local project in Vs code.
In our case, we will be using the command line(npm) process, as stated below
Using any preferred command prompt, cd into the app folder.
Run a build command on the project(This will create a build folder on our project to handle production)
npm run build
- Install Firebase into the project
npm install firebase
- Install firebase CLI
npm install -g firebase-tools
- Login To Firebase
firebase login
- Initialize firebase in the app
firebase init
This will come with a set of questions that need to be responded to correctly.
As follows:
"Are you ready to proceed?" you have to click "y" to respond to yes.
Which Firebase features do you want to set up for this directory? In our case we will be needing the hosting feature so you use the arrow key to the option "Hosting: Configure files for Firebase Hosting and (optionally) set up GitHub Action deploys", Press Space to select features, then Enter to confirm your choices.
It will then give you a list of your firebase projects to choose from, and you will choose the project you want to host and deploy most definitely.
What do you want to use as your public directory? In this case, you just have to type "build", because we have a build folder we created to handle our production.
Configure as a single-page app (rewrite all urls to /index.html)? the answer is "y", denoting yes.
Set up automatic builds and deploys with GitHub? Can be "y" or "n" depending on your choice.
File build/index.html already exists. Overwrite? the answer is "n", denoting no, we don't want to overwrite our build folder's index.html
And this will initialize firebase into our application. The next and last thing to do now is to deploy our app with the command below.
firebase deploy
This will deploy and host our app, the action will end with providing us two links, one to our live project and the second one to the console where we can see the performance/dashboard of our hosted app.
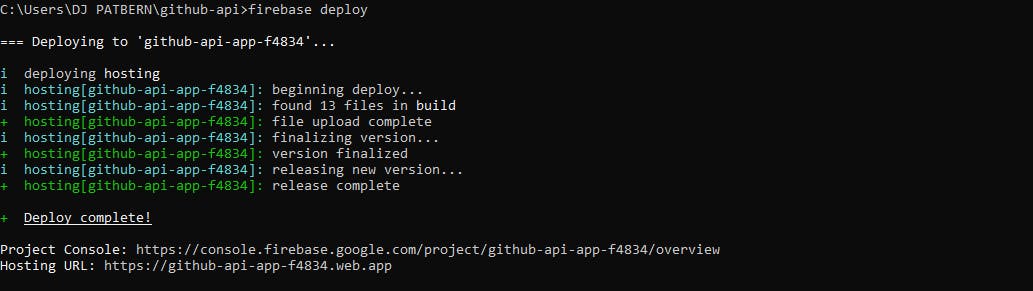
And that's how I gave birth to my GitHub Profile Web Application. You can visit here
Or view the outputs below
Home Page
Profile Page
Repos Page
Repo's Nested Page
Bomb Page(Testing Error Boundary before 'bomb' is typed)
Error Message after 'bomb' is typed

404 Page(Showing when one navigates to an undefined route)